Table of contents
Amazon DCV (formerly NICE DCV) offers a high-performance, secure solution for delivering remote desktops and 3D applications. However, setting up DCV infrastructure manually can be time-consuming and prone to errors.
This blog post walks you through the automation process using AWS tools and XOAP to simplify the deployment of Amazon DCV.
How does it work?
Using prebuilt scripts, XOAP’s Image Management module and the Scripted Actions feature, you’ll spin up a fully functional Amazon DCV environment efficiently, reducing setup time, ensuring consistency and enabling rapid scaling in the cloud.
You can test everything in this tutorial for free, as both Image Management and Scripted Actions are available in XOAP’s free plan. Just create your account first.
The Amazon DCV deployment will take five steps:
- Download a script from AWS.
- Change the username in the script and upload it to XOAP.
- Create a connection to your AWS environment.
- Prepare your image for DCV deployment with Image Management.
- Spin up the DCV infrastructure with Scripted Actions.
Let’s go into the details now.
Download the script from the official AWS GitHub repository here. You can find the documentation in the AWS Administrator Guide.
Step 2: Uploading script to XOAP
Now, let’s edit the script quickly before uploading it:
• Remove the first and last lines of code: <powershell> and </powershell>.
• Replace the placeholder “USERNAME” in line 51 with a valid username.
• Remove the comments from lines 49 to 52 (optional, but considered a good practice).
To upload the script, open your XOAP Workspace and go to the Resources area in the left-side menu. Click + New Resource, then simply drag and drop the script. Click Next and Save.
Step 3: Creating a connection to your AWS environment
In XOAP, connections are used to deploy image definitions, as well as to provision and configure cloud and on-premises environments.
• Go to Connections in the left-side menu.
• Click + New Connection.
• Select AWS as the provider and choose the connection type.
• If you’re using the AWS-Access Key type, provide your Access Key ID, Secret Access Key and Account ID.
• Click Confirm to save the connection.
Step 4: Preparing image for DCV deployment
The next step is Image Management. It’s a custom image automation module that can be found in your XOAP Workspace.
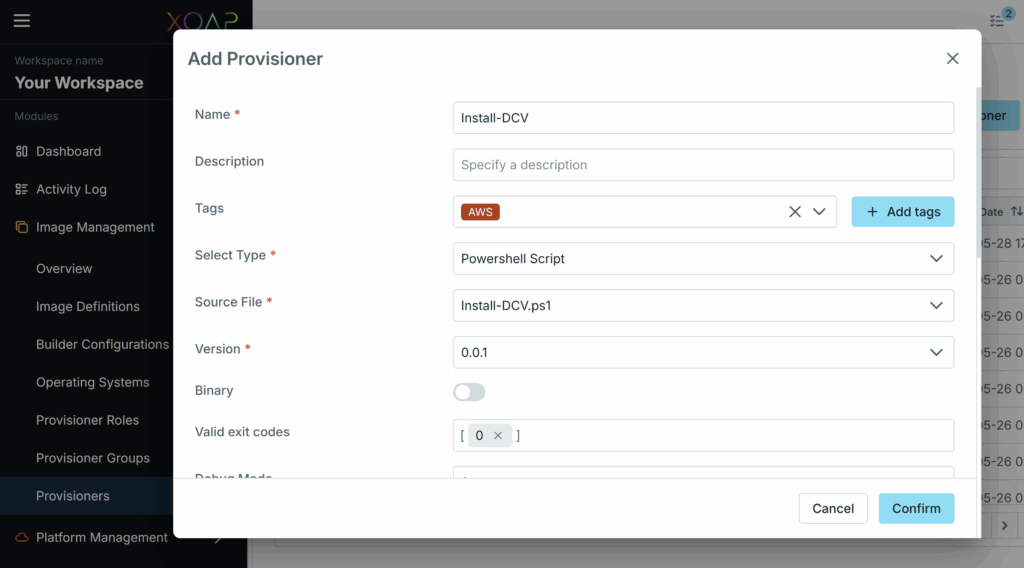
First, create a provisioner:
• Click on Image Management, then click on Provisioners in the drop-down menu.
• In the Provisioners area, click + New Provisioner.
• Under Select Type, choose PowerShell Script.
• Under Source File, select Install-DCV.ps1, the script you uploaded to XOAP.
• Enter the mandatory information and click Confirm.
Now, add that provisioner to a group:
• Go to Image Management > Provisioner Groups.
• Click + New Provisioner Group and select the provisioner you’ve created from Available Provisioners.
• Enter the details and click Save.
Add the group to a provisioner role:
• Go to Image Management > Provisioner Roles.
• Click + New Role and select the group you created from Available Provisioner Groups.
• Enter the details and click Save.
Note:
Each XOAP Workspace is equipped with Operating Systems that can be used as templates for further customizations. Operating system availability depends on the region and may vary. If your region is not available and you would like to adjust the operating system, you can add additional ones as needed.
The same applies to Builders, which define the connection being used, the region, the size of the VM defined to build the image and additional optional settings. You can create them before the next step or add them while defining the Image Definition.
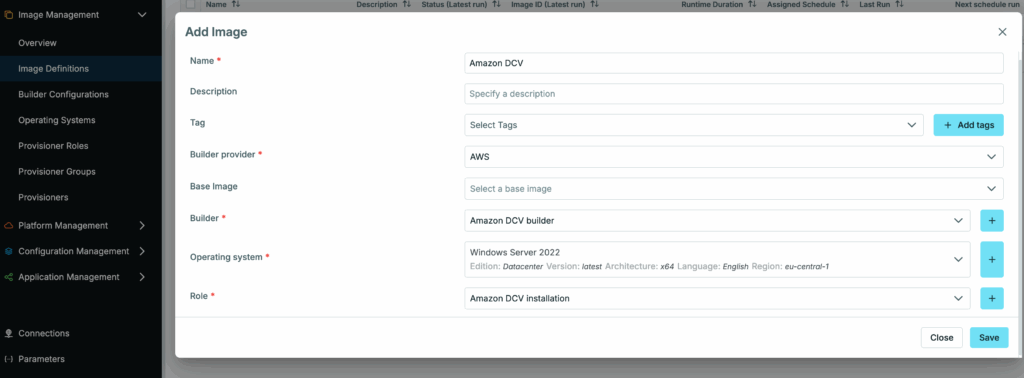
• Now go to Image Management > Image Definitions and click + New Image. Here you will create your image – see screenshot below as a reference. If you need help creating the image, watch this short video tutorial.
Once your image is created, it will appear in Image Definitions.
• Click the three dots on the right in the image’s row, then click Run.
You can track the progress of the Image Definition build by either clicking on the status badge or by clicking on Runs in the upper right corner.
Once the run is finished, in the Image ID field, you will see the ID as ami-xxxxxxxxxxxxxxxxx.
It’s good to save the image ID now, as you will need it to spin up you DCV infrastructure later.
Important:
• If you don’t have it in your XOAP Workspace already, download the EC2 provisioning script ⬇️ below and upload it to the Resources area, just like you did with the first AWS script.

Download the EC2 provisioning script
Step 5: Spinning up DCV infrastructure
Now that you’ve uploaded the EC2 provisioning script to Resources, let’s move to Scripted Actions.
You will find this feature in your XOAP Workspace under the Platform Management module, which helps you automate hybrid infrastructures and cloud workflows.
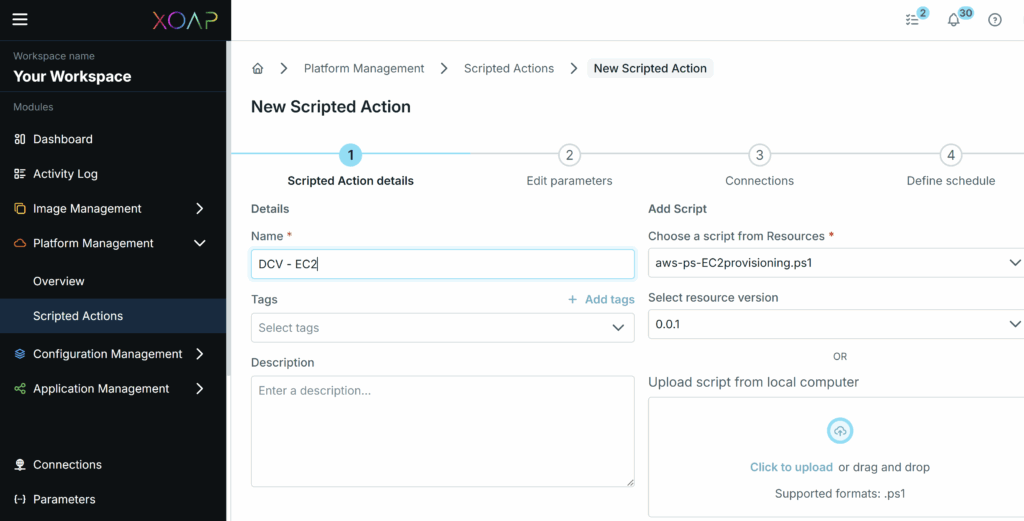
• Go to Platform Management > Scripted Actions and click + New Scripted Action.
• Enter a Name for this scripted action.
• Under Choose a script from Resources, select the EC2 provisioning script.
• Click Next.
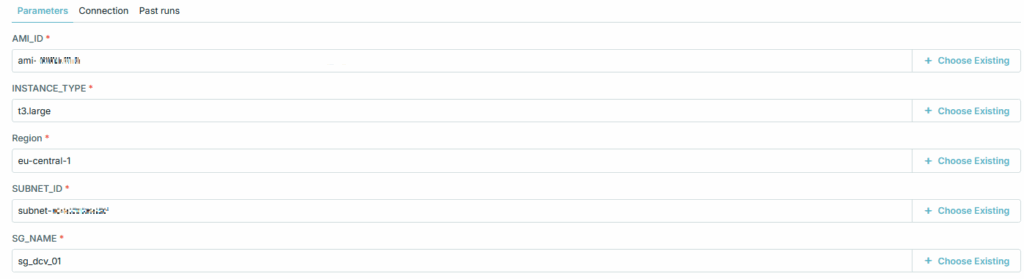
• Edit script parameters as shown below.
Important:
Under AMI_ID, use the Image ID from your Image Definition run. Specify the region where you want the EC2 instance to be created, along with the SUBNET_ID of the VPC where you want the instance to be placed. Make sure you choose the same region that was specified in your Image Definition. Otherwise, the AMI won’t be found, as they are region-specific.
• When everything’s ready, click Next.
• Select AWS from the Connections table and click Next.
• In the final scripted action creation step, you can schedule your scripted actions. We can skip that for now, so just click Finish.
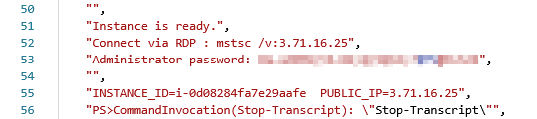
The scripted action is now created and you can run it the same way you ran your Image Definition. If you want to track the progress, click on the status badge right next to the scripted action. Once the run is finished, the DCV will be ready.
You can find all the information necessary for connecting to the DCV in the scripted action’s log. To access the log, click the three dots on the right side in the scripted action’s row and click View log.
To connect to the DCV, you can use web access or the Amazon DCV client, which is available for download from AWS. Be mindful of the required Security Group rules when connecting. Direct access to the instance will be required (for web access, you will need a public facing instance).
Alternatively, you can deploy the Amazon DCV client to your endpoints worldwide using XOAP’s Application Management module. Application Management automates and simplifies software packaging and delivery to any device. This way, you can easily create a remote access solution for your endpoints.
👉 Did we miss something? If you need help using XOAP to automate Amazon DCV deployment, just book a call 📅 and our engineers will walk you through it.
More about XOAP:
→ More on Application Management
→ Automating your entire AWS operations
→ Standardized image automation across platforms
→ Scripted Actions for centralized script management