Table of contents
If you’re planning to upgrade your devices to Windows 11, there are several ways to go about it. In our previous blog post, we showed how to use the Windows Update settings to start the upgrade.
In this post, we’ll focus on using Group Policy Objects (GPOs) and registry keys to manage the migration. Even if you’re using Windows Update to deploy updates, you can still control how and when Windows 11 is offered to eligible devices.
By setting the right policies, you can make sure the upgrade process fits your organization’s needs.
Guide: Windows 11 migration using GPOs/registry keys
If you are deploying updates using Windows Update, there is still a possibillity to control their delivery using different GPOs. And if you set/change proper policy, Windows 11 will be deployed on your devices if they are eligible to upgrade.
How to specify target Feature Update version in Windows 10
A new TargetReleaseVersion policy available in Windows 10 version 1803 and higher allows you to specify which feature update version of Windows 10/11 you would like your computer to move to and/or stay on until the version reaches the end of service or you reconfigure this policy.
If you don’t update this policy before the device reaches end of service, the device will automatically be updated once it is 60 days past end of service for its version.
If you specify a TargetReleaseVersion the same as the current version, Windows 10 will stay on this version until it reaches the end of service. This can also be useful to block an automatic upgrade to Windows 11.
If you specify a TargetReleaseVersion higher than the current version, Windows 10/11 will directly update only to the specified version, even if a higher version is available.
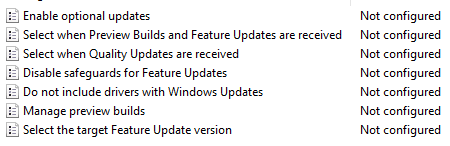
Specify target Feature Update version in Local Group Policy Editor
- Open the Local Group Policy Editor.
- Navigate to the location below in the left pane of Local Group Policy Editor (see screenshot below);
Computer Configuration > Administrative Templates > Windows Components > Windows Update > Manage updates offered from Windows Update.
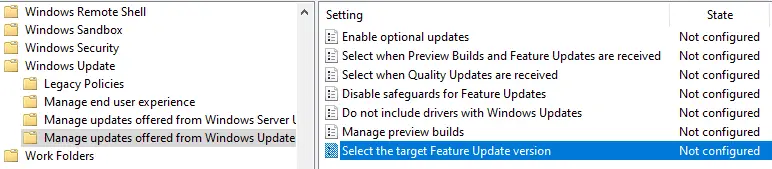
- In the right pane of Windows Update for Business in Local Group Policy Editor, double click/tap on the Select the target Feature Update version policy to edit it (see screenshot above).
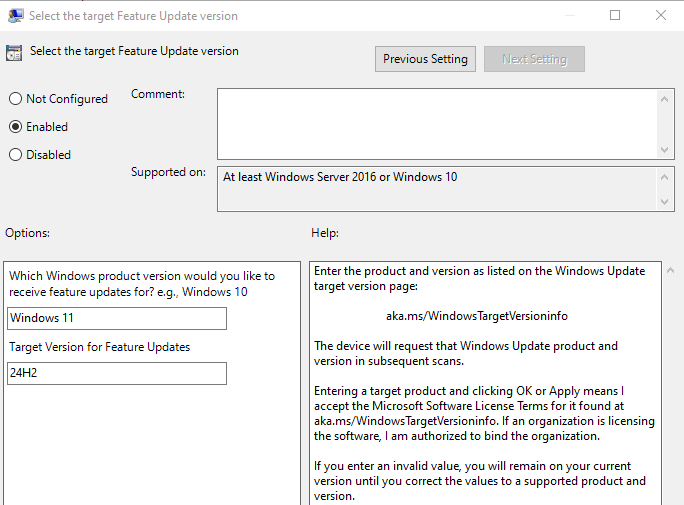
- Select (dot) Enabled (see screenshot below).
- Perform the following steps under Options:
Type which Windows product version would you like to receive feature updates for? E.g, Windows 10: Windows 11.
Type the version (e.g, “21H1”) you want to specify in the Target Version for Feature Updates: 24H2.
Click/tap on OK.
If you want to set the same options via registry keys, use the following key and values:
HKEY_LOCAL_MACHINE\SOFTWARE\Policies\Microsoft\Windows\WindowsUpdate
“ProductVersion”=”Windows 11”
“TargetReleaseVersion”=dword:00000001
“TargetReleaseVersionInfo”=”24H2”
You can see a list of Windows 10 versions to use as a value in the Windows 11 release information table.
And you're done!
That’s it, your Windows 11 migration using GPOs and registry keys is complete. With these steps in place, your devices should upgrade smoothly and stay on track. Keep testing, keep things backed up and you’ll be good to go.