Table of contents
When a new hardware batch arrives, the expectation is straightforward: devices should be provisioned, configured and enrolled in the management platform with minimal delay. In practice, however, bare metal deployment is often one of the most labour-intensive stages of the device lifecycle.
XOAP addresses this through an automated, repeatable deployment pipeline that provisions a device from bare metal and connects it to the correct XOAP workspace without requiring manual intervention at the device level.
This article describes how the process works and outlines both supported deployment methods: PXE boot and USB.
How XOAP approaches bare metal deployment
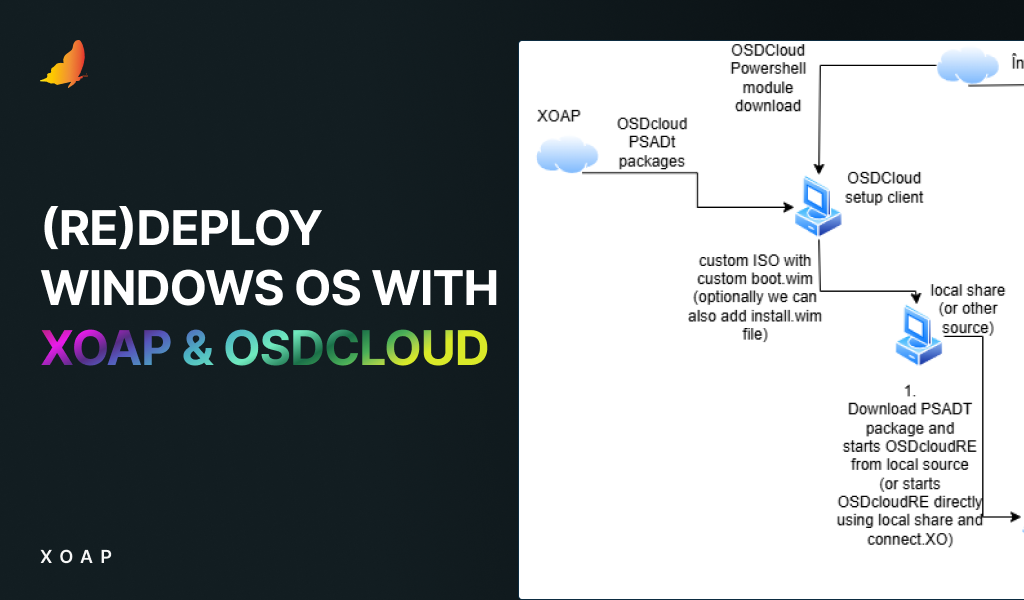
The deployment pipeline is built on OSDCloud, a PowerShell-based framework for OS installation via Windows PE. XOAP extends this with a preconfigured set of PSADT packages that handle environment setup, image creation and post-installation enrollment – producing a deployment artefact that is repeatable, parameterised and tied to a specific XOAP workspace and configuration group.
The critical mechanism is what occurs at the end of each installation. Once the operating system has been applied, OSDCloud executes SetupComplete scripts that register the device with XOAP automatically. If internet connectivity is unavailable at first boot, a scheduled task is created that checks for connectivity on every user logon and initiates enrollment as soon as a connection is established. Once the device is registered, the task deregisters itself.
The result is a device that enters the managed environment without requiring any post-installation steps from the engineer.
Deployment methods
XOAP supports two distinct paths for bare metal OS deployment, each suited to a different infrastructure context.
Method 1: PXE boot (network deployment)
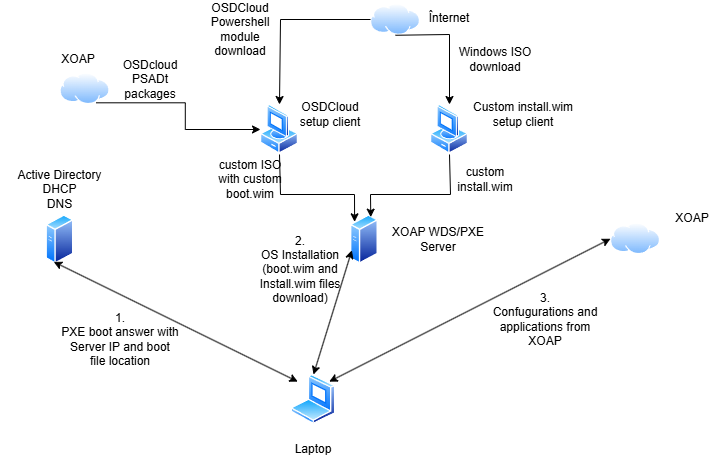
PXE boot is appropriate for large-scale deployments within environments that have Active Directory, DHCP and DNS in place. Devices boot from the network and receive a custom Windows PE environment that drives the full installation without a physical boot medium.
Infrastructure requirements
- Active Directory, DHCP and DNS environment
- One Windows Server VM (2019, 2022 or 2025) for the WDS/PXE role
- One Windows 11 24H2 VM for building the OSDCloud ISO
- Internet access for the build VM and for newly staged devices
Setup process
The process begins on the ISO creator VM. Using XOAP application roles or locally installed PSADT packages, Windows ADK and Windows PE for ADK are deployed first, followed by the OSDCloud ISO Creator package. This package accepts the required deployment parameters – OS version, build, edition, language, activation method, target XOAP Workspace ID and Configuration Group – and produces a custom OSDCloud_NoPrompt.iso in C:\OSDCloudWorkspace. The resulting ISO contains the XOAP enrollment configuration, ensuring that every device deployed from it connects to the correct workspace and configuration group.
The boot.wim file is extracted from the ISO and imported into Windows Deployment Services on the WDS server. The install.wim from a standard Windows ISO is placed in the XOAP share at C:\RemoteInstall\Images\XOAP\OSDcloud\OS. Where bandwidth is constrained or internet access is unavailable during staging, the Windows image can alternatively be sourced from a local network share – a separate ISO Creator package and additional parameters (ShareUser, ShareUserPassword and UncSharePath) are required for this variant.
DHCP scope options complete the server-side configuration: option 066 (Boot Server Host Name) pointing to the WDS server and option 067 (Bootfile Name) pointing to the UEFI boot file. Any device that PXE boots on the configured network segment is then served the Windows PE environment automatically.
Device-side experience
The technician connects the device to the deployment network and initiates PXE boot, typically via F12 on startup. The WDS Boot Manager presents the available WinPE images, the correct image is selected, and the operator chooses the target Windows image and edition. After confirming disk cleanup, the installation completes without further interaction. The device reboots into a freshly installed, XOAP-managed Windows environment.
A notable capability of the PXE approach is that multiple boot.wim files can be imported into WDS, each configured with a different XOAP Workspace ID or Configuration Group. A single WDS server can therefore serve deployments across multiple clients or environments, with the operator selecting the appropriate boot image at startup. For MSPs managing multiple tenants, this provides multi-tenant isolation at the image level.
Method 2: USB stick (standalone deployment)
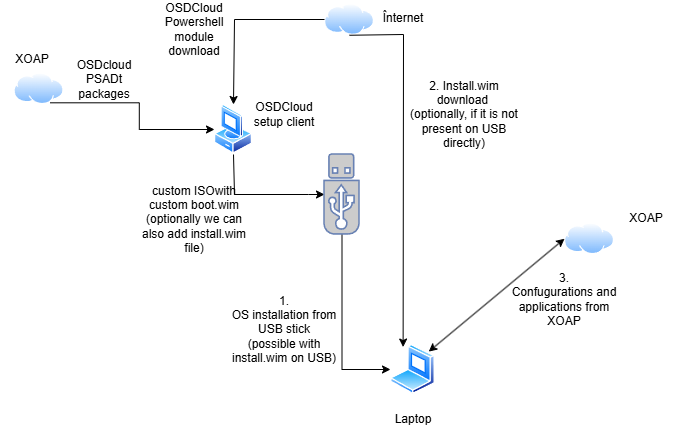
The USB method is suited to deployments where no PXE or DHCP infrastructure exists – at a new client site, in a remote office or for smaller ad hoc rollouts. The underlying process is the same but the boot environment is delivered from a USB drive rather than a network server.
Infrastructure requirements
- One Windows 11 24H2 VM to build the OSDCloud ISO
- One physical workstation to create the bootable USB
- Internet access for the build VM and staged devices
Setup process
ISO creation follows the same procedure as the PXE method: deploy Windows ADK, Windows PE for ADK and the OSDCloud ISO Creator via XOAP or PSADT packages with the appropriate parameters. The resulting OSDCloud_NoPrompt.iso contains the customised boot environment with XOAP enrollment embedded.
The ISO is transferred to a physical machine, where the OSD PowerShell module is used to write it to a USB drive:
Install-Module -Name OSD
New-OSDCloudUSB -fromIsoFile “C:\Path\To\OSDCloud_NoPrompt.iso”
The command prompts for the target USB drive and confirmation of the wipe. Where deployment from a local Windows image is preferred over an internet download, an install.wim file can be copied to OSDCloudUSB:\OSDcloud\OS\ on the USB after creation.
Device-side experience
The technician connects the USB, boots from it and the OSDCloud WinPE environment initialises. Where the device has no wired network connection, a wireless network selection prompt appears automatically – WLAN support is provided via WinRE integration in the boot environment. The operator selects the Windows image and edition, confirms the disk wipe, and the installation proceeds. Post-installation enrollment via SetupComplete follows the same process as the PXE method.
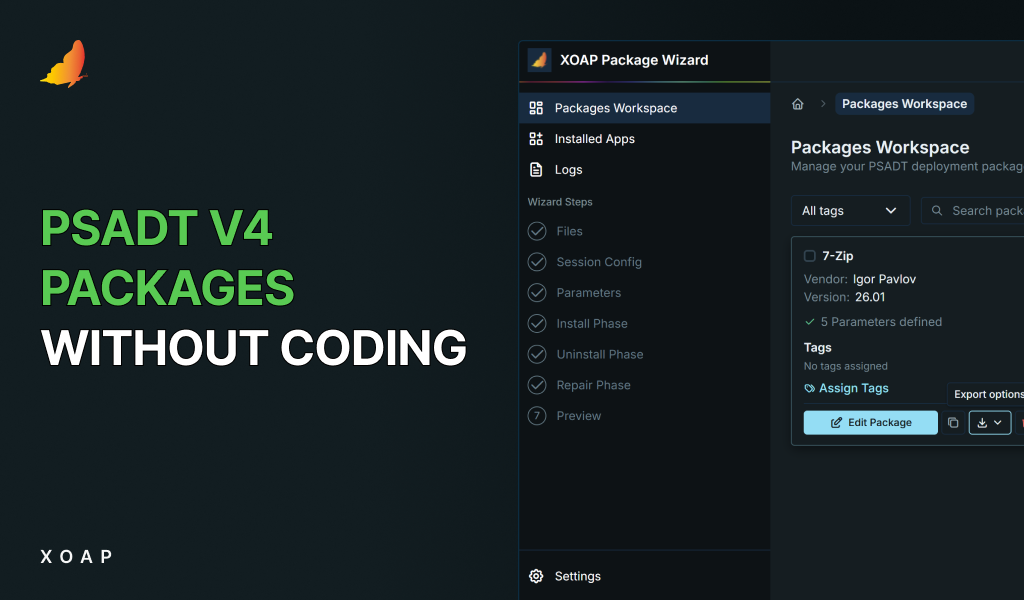
The OSDCloud XOAP package stack
Both deployment methods rely on the same three-package stack. Windows Assessment and Deployment Kit (ADK) – version 10.1.26100.2454: the foundational requirement for building custom WinPE environments. Windows PE for ADK – version 10.1.26100.2454: extends ADK with the Windows PE add-on, enabling bootable pre-installation environments. OSDCloud ISO Creator: the package that contains the XOAP-specific logic. It installs the OSD PowerShell module, creates the OSDCloud template with WinRE (required for WLAN support in WinPE), configures the OSDCloud workspace and embeds the SetupComplete and StartNet scripts responsible for XOAP enrollment. Hardware drivers are injected into the boot.wim at this stage. The output is OSDCloud_NoPrompt.iso.
The parameters required at install time are: driver set, OS activation method, OS build (e.g. 24H2 or 25H2), OS edition, OS language, OS version, target XOAP Configuration Group and XOAP Workspace ID.
To generate images for multiple XOAP workspaces, the package is run again with different parameters. The ISO must be renamed or moved between runs, as each execution overwrites the previous output at the same path.
Ready to see it in action?
XOAP’s bare metal deployment capability is one component of a broader infrastructure automation platform that takes devices from zero to fully managed with minimal manual touchpoints at every stage.
Book a demo to see how XOAP handles OS deployment, endpoint management and configuration delivery across your entire device fleet.