Table of contents
Thinking about moving your organization to Windows 11? With SCCM (System Center Configuration Manager), there are two ways to get it done: Windows servicing and Task sequence. In this tutorial, we’ll walk you through both methods so you can choose the best fit for your environment.
Windows servicing
Configuration Manager requires only minimal configuration before deploying feature updates to computers. If you’ve previously deployed feature updates, most prerequisites are likely already in place. However, for new SCCM setups, some initial configuration may be necessary.
Prerequisites for the Windows 11 23H2 upgrade using SCCM
- Configure Software Update Point by enabling the upgrades for Windows 10 and Windows 11.
- Ensure the service connection point is online before you sync the updates.
- Enable dynamic updates for feature updates in Configuration Manager Client Settings.
- The product category “Windows 11” must be enabled under Software Update Point > Products.
First, you need to download the Windows 11 23H2 enablement package update using SCCM.It is recommended first to downloadthe enablement package, then distributing the content to distribution points, and finally deploying it.
Steps to get Windows 11, Version 23H2 update in SCCM
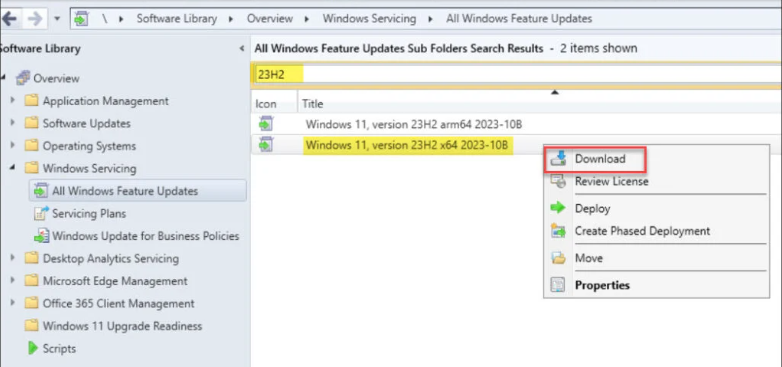
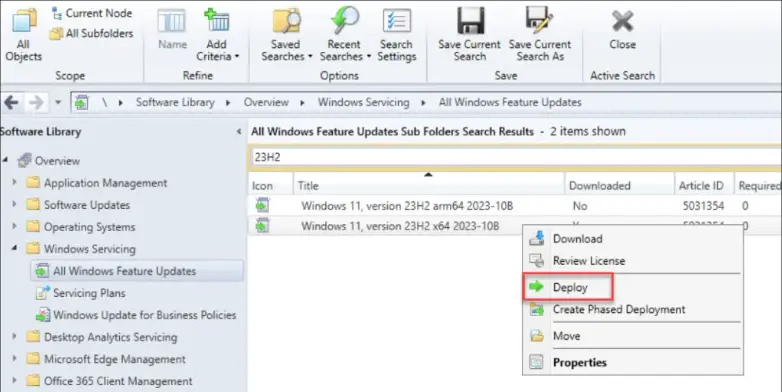
In the SCCM console, go to Software Library > Windows Servicing > All Windows Feature Updates. Then, in the search box, type “23H2” and click Search. This will filter the updates and display only 23H2 updates. Right-click on Windows 11, version 23H2 x64 2023-10B and select Download.
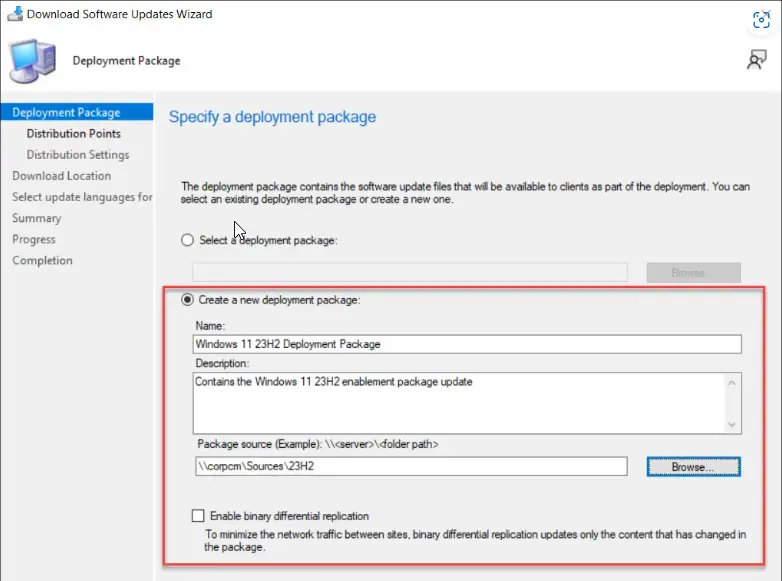
On the Deployment Package window, you must specify the deployment package for Windows 11 23H2 upgrade files. This deployment package that you create will contain the software update files that will be deployed to the clients.
Select “Create a new deployment package” and specify the package name as “Windows 11 23H2 Deployment Package.” Specify the package source, which is a shared folder where you want to download the updates. Enabling the binary differential replication is optional. Click Next.
On the Distribution Points page, click on the Add button and choose the distribution point servers to which you would like to distribute the Windows 11 23H2 upgrade files. Click Next.
Then, on the Distribution Settings page, configure the general distribution settings for the deployment package. Click Next.
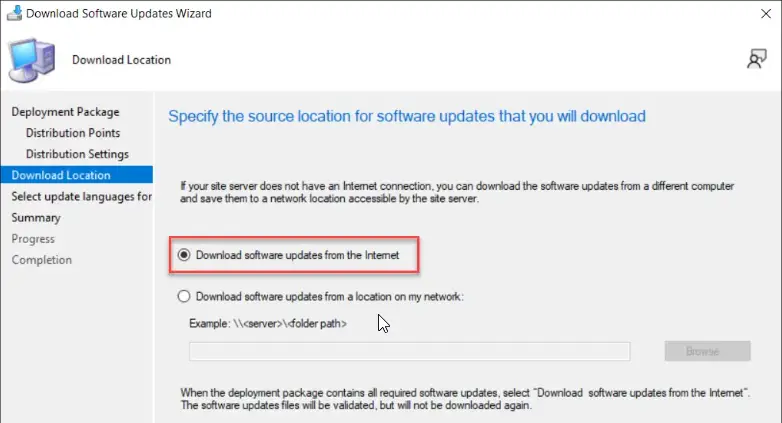
Select an option to specify from where you want to download the updates. In the example below, we have selected the option Download software updates from the internet. Click Next.
On the Summary window, review the settings for the deployment package and click Next. Now, on the Progress tab, we see the Windows 11 23H2 Enablement Package updates being downloaded.
Steps to deploy Windows 11 23H2 feature update using SCCM
In the ConfigMgr console, navigate to Software Library\Overview\Windows Servicing\All Windows Feature Updates. Right-click Windows 11, version 23H2 x64 2023-10B update, and select Deploy.
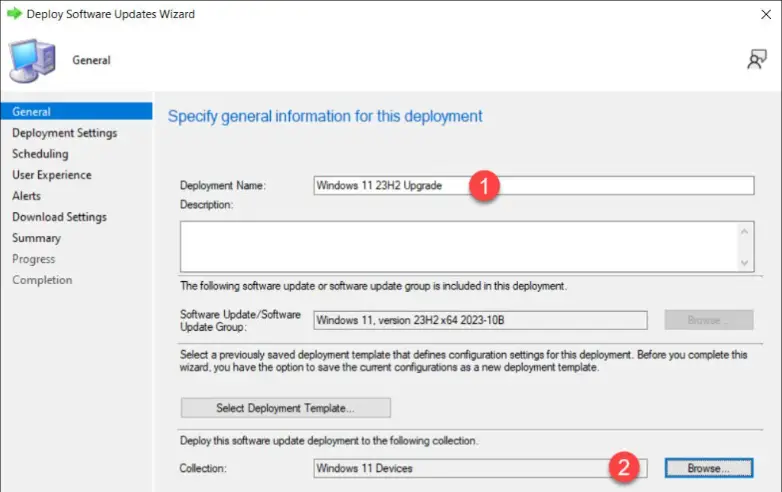
On the General page, enter the details for the Windows 11 23H2 feature update deployment.
- Deployment name: Enter the deployment name, for example, Windows 11 23H2 upgrade.
- Description: Add a brief description about the deployment.
- Software Update Group: This is created automatically and is visible under Software Update Groups in the Configuration Manager console.
- Collection: Click Browse and select a device collection consisting of a few pilot devices selected for testing the Windows 11 2023 upgrade. After that, click Next to continue.
Accept the license terms for the Windows 11 23H2 update. Click Next.
On the Deployment Settings page, specify the type of deployment. Choose whether you want to make the Windows 11 23H2 upgrade available for users in the Software Center or deploy it as required.
The Scheduling page lets you configure schedule details for the deployment. If you want to make the Windows 11 23H2 upgrade available at a specific date and time, select Specific Time and define it. Define the deadline for installation to ensure the upgrade happens within the defined period. Click next to continue.
Specify the following user experience settings for the 23H2 update deployment:
- User notifications: Display in Software Center and show all notifications
- Commit changes at the deadline or during a maintenance window (requires restarts): Yes
- If any update in this deployment requires a system restart, run updates deployment evaluation cycle after restart: No.
Click Next.
On the Download Settings tab, specify the download settings for the current deployment:
- Client Computers can use distribution points from neighbor boundary: Yes
- Download and install software updates from the fallback content source location: Yes
Click Next to continue.
- Review the deployment settings of Windows 11 23H2 on the Summary page and click Next. On the completion window, click Close.
Test the upgrade installation
After you have deployed the Windows 11 23H2 enablement package update using Windows Servicing, it’s time to test the upgrade installation on Windows computers. The end-user experience is similar to other feature upgrades.
On the client’s computer, launch the Software Center. Once the Software Center has been opened, select Windows 11, version 23H2 x64 2023-10B update by clicking the Updates tab. Click on the Install button.
Confirm that you want to upgrade this computer’s operating system. Note that this is an in-place upgrade to version 23H2, and the setup automatically migrates your apps, data, and settings. Click on the Install button to begin the Windows 11 23H2 upgrade.
Restart, and now the computer reboots. After it has rebooted, the operating system version is Windows 11 23H2.
Task sequence
To do an in-place upgrade of Windows 10 to Windows 11 via SCCM Task sequence, you must import the Windows 11 upgrade package into SCCM.
Steps to add or import Windows 11 upgrade package into SCCM
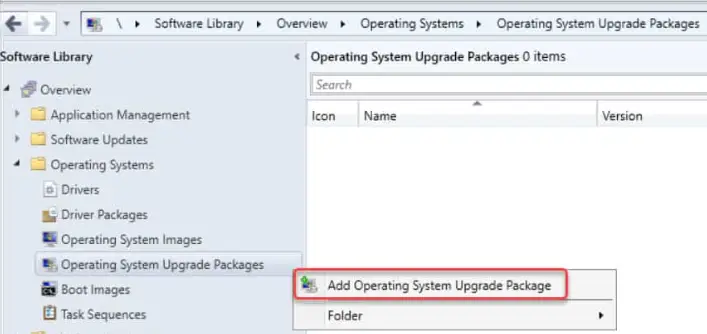
- Launch the SCCM console.
- Navigate to Software Library > Operating Systems > Operating System Upgrade Packages.
- Right-click Operating System Upgrade Packages and click Add Operating System Upgrade Package.
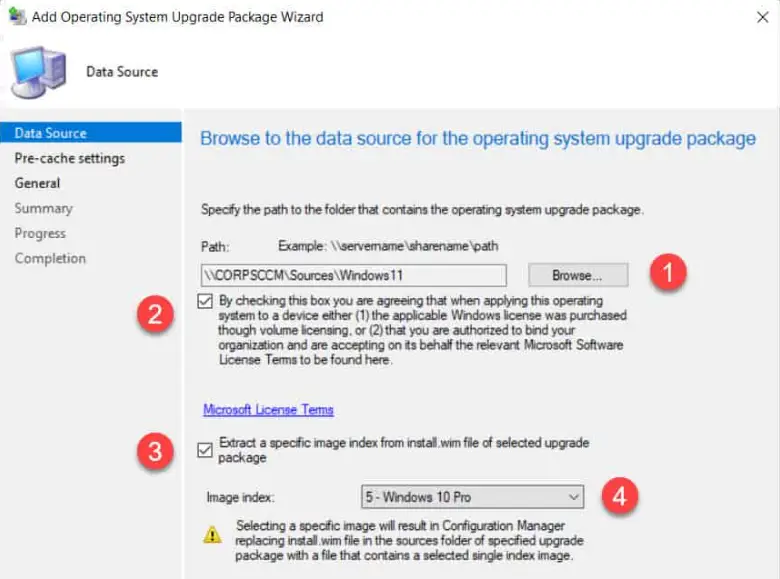
On the Data Source page, click Browse and specify the folder path that contains the Windows 11 setup files. This is the folder that contains the extracted Windows 11 ISO file.
Select the option: By checking this box, you agree that when applying this operating system to the device, the applicable Windows license was purchased through volume licensing. Or that you are authorized to bind your company and agree to the Microsoft license terms on its behalf.
Check the box – extract a specific image index from install.wim file of the selected upgrade package. Select the image index appropriately and click Next.
On the General window, specify the upgrade package name as Windows 11 upgrade. You may add more details in the comment box and click Next. Click Next on the Summary window.
On the Completion window, click Close. We have successfully imported the Windows 11 upgrade package in SCCM.
Create task sequence
To create a Windows 11 In-place upgrade SCCM Task Sequence, do the following:
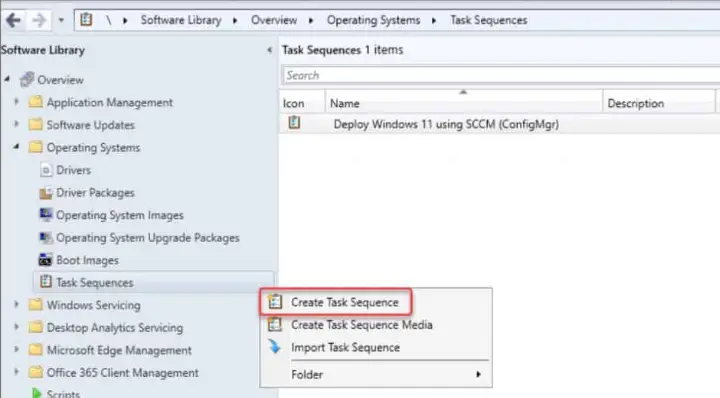
• Launch the Configuration Manager console.
• Go to Software Library\Overview\Operating Systems\Task Sequences.
• Right-click Task Sequences and select Create Task Sequence.
On the Create a new task sequence page, select Upgrade an operating system from an upgrade package. Click Next.

On the Task Sequence Information page, specify the task sequence name, such as in-place upgrade of Windows 10 to Windows 11 or something meaningful. Add an optional description. Click Next.
On the Upgrade Windows operating system page, select an upgrade package, click Browse and select Windows 11 upgrade package. The edition index is automatically populated. Click Next.

On the next page, select Do not install any software updates. Click Next. If you have any applications that you need to install along with this upgrade, you can define them on the Install Applications page. Otherwise, click Next.
Review the settings on the Summary page and click Next.
Finally, on the Completion page, click Close. This completes the steps for creating a Windows 11 in-place upgrade task sequence.
Deploy task sequence
After the task sequence is created, you need to distribute the content to your distribution points and deploy the task sequence to the desired SCCM Collection:
- In the ConfigMgr console, go to Software Library\Overview\Operating Systems\Task Sequences.
- Right-click Windows 11 upgrade task sequence and click Distribute Content to distribute content to distribution points.
- Right-click Windows 11 upgrade task sequence and click Deploy to deploy the task sequence to the desired SCCM collection.
Once the task sequence is deployed and becomes available on the client, it will pop up in the client Software Center under Operating Systems.
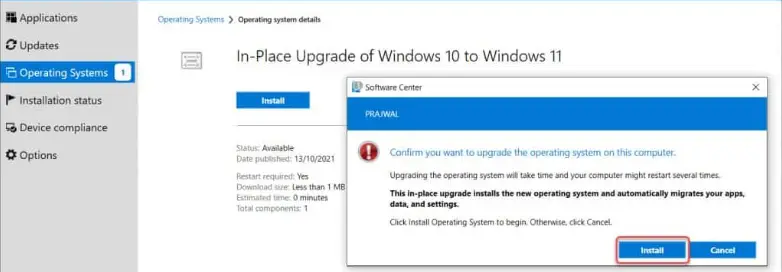
The user will be asked to confirm if they want to upgrade the operating system on this computer. Select Install.
The task sequence progresses now and the Windows 11 upgrade files will be downloaded to the computer. The task sequence displays the Windows 11 upgrade progress percentage.
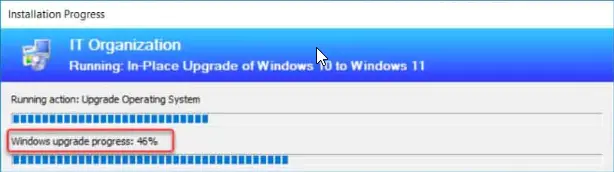
When the in-place task sequence is running, you can monitor the deployment by reviewing the smsts.log file. During the Windows 11 upgrade, the smsts.log file is located in C:\Windows\CCM\Logs\SMSTSLog folder on the client machine. The task sequence restarts the computer to complete the upgrade.
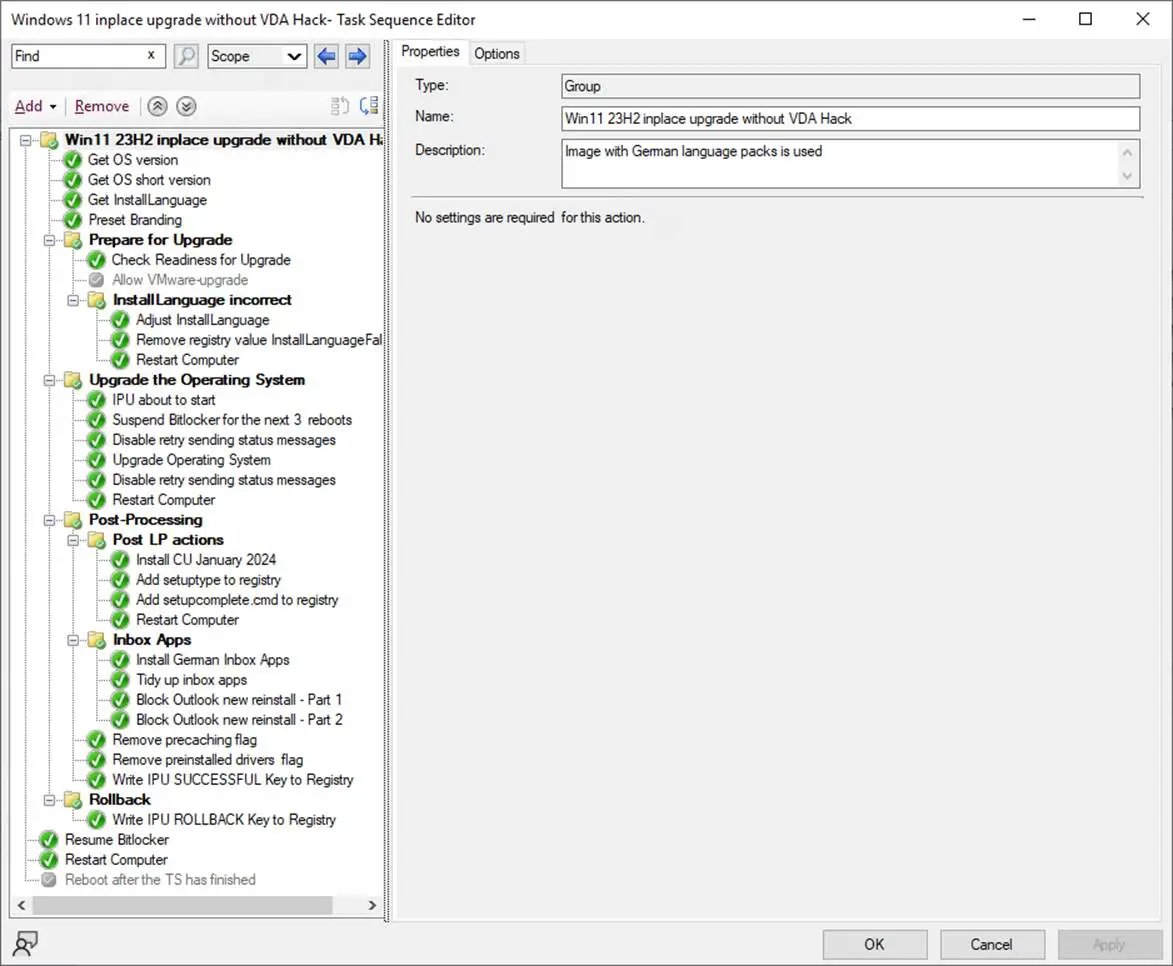
Of course, there is a possibility to adjust the task sequence to do a couple of extra steps.
For example, in the task sequence below.
Before upgrading to Windows 11:
- Extra checks are performed before upgrade
- InstallLanguage registry key is corrected if needed
- BitLocker is suspended
After Windows 11 upgrade:
- CU is installed (needed if you have an extra language pack injected in your wim file)
- Inbox/Store Apps are installed with the proper language
- Unwanted Inbox/Store Apps are removed
- Outlook New is removed and blocked
- IPU Successfull flag is written to registry
Need help?
Whether you go with Windows servicing for a simpler in-place upgrade or a Task sequence for more control and customization, SCCM makes it easy either way.
Questions? We’re just a message away! 💬